| - Why
- Application Wizards
- Splitter Wizard
- Application settings tab
- Splitter setting page
- Child view settings page
- Class Wizards
- Dialogue wizard
- Subclassing control wizard
- And Extended WTL Control wizard
- Conclusion
Why The WTL has one drawback an absence of support by any IDE. I try to solve this issue by WTL Helper. And now I add some wizards that can help you to work with WTL.
Application Wizards After installation there will be one more template for creating projects.
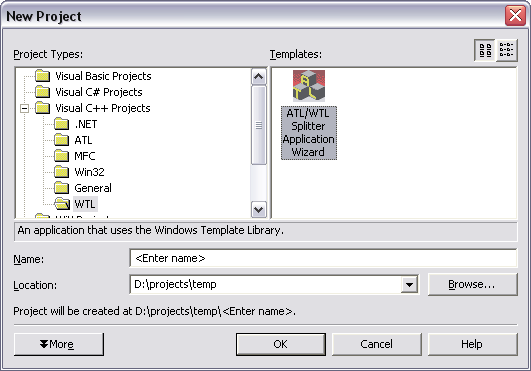
Splitter Wizard When you run it you will see following
Application settings tab 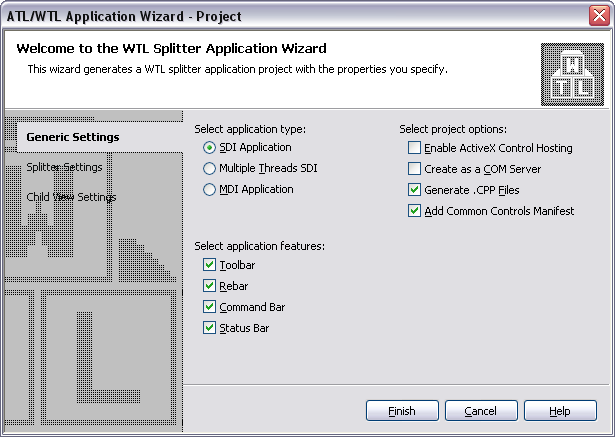
The main differences between this one and standard WTL wizard are absence of application type dialog and property "Generate .CPP files" is set by default. Also I delete page Overview because I think it is unnecessary.
Splitter setting page 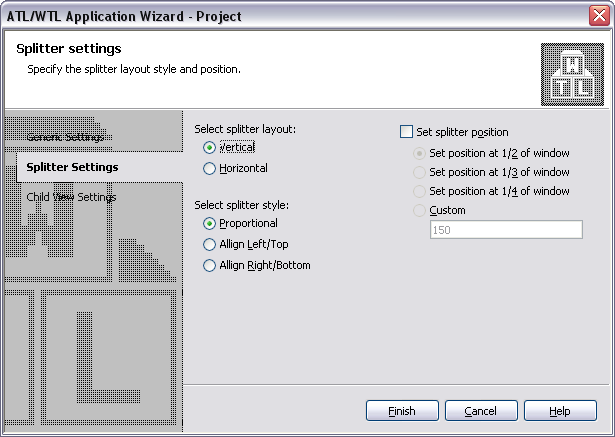
You can choose some splitter options on this page
Splitter layout: Vertical means that splitter bar is located vertically, i.e. child windows are on left and on right from splitter bar. Horizontsal means that splitter bar is located horizontally.
Splitter style:
Proportional means that size of each child window (and position of splitter bar) changes proportionally of changing size of splitter window.
Allign left (for horizontal splitter top) means that when splitter window size changes, size of only child window which is on right (bellow) from splitter bar changes, and size of another window stays unchanged.
Align right (bottom) works similar to allign left only that left (top) window changes its size and right (bottom) is unchanged.
There is one peculiarity. If you don't set splitter position at start of application then if splitter style is proportional or right aligned then splitter bar will adjoin to left (for proportional) or to right (for right aligned) side of splitter window. However, for left alligned style, splitter bar will be in the middle of splitter window.
Splitter bar position
You can set starting position of splitter bar in the application wizard. You can set as well as relative as absolute value of position. For this purpose the following function is generating
void CMainFrame::SetSplitterPos(int iPos)
{
    if (iPos < -1)
    {
        RECT rc;
	m_wndSplitter.GetClientRect(&rc);
        iPos = (rc.right - rc.left) / (-iPos);
    }
    m_wndSplitter.SetSplitterPos(iPos);
}
If you put positive value of parameter then this function set absolute value of the position, else relative value.
It is used splecial message to set splitter bar position. This message is sent to frame window using PostMessage. It is done because when splitter is created it has zero size (if you don't set it manually replacing rcDefault with yours) and so it cannot set bar position correctly. It get correct size after processing message WM_SIZE by frame window. That why I use PostMessage, it only add message to message queue and it will proceed after processing WM_SIZE. This is right place where splitter bar position should be set.
Child view settings page 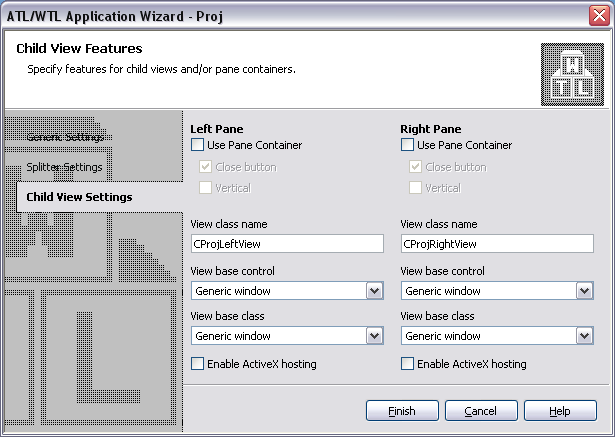
As you can see on picture above there are 2 views which are setting up simultaneously, so I will descibe only for first one.
Use Pane Container:
If you set this option then object of class CPaneContainer will be used as child window for splitter and view will be create as child for this object. You can choose two options for the object: show button for closing and its position, horizontal by default or vertical. If you choose to show close button the code which close current window and switch splitter in the single pane mode will be generated if you press it.
I hope with view class name is everything clear.
Base control for view.
Generic window by default but can be any windows control like Edit, ListView etc or HTML page.
Base class for view
The class the view will be inherited from. For generic window this is CWindowImpl, for dialogue is CDialogImpl or any other from the list. Class Wizards After installation the dialogue on Project->Add Class will look like following.
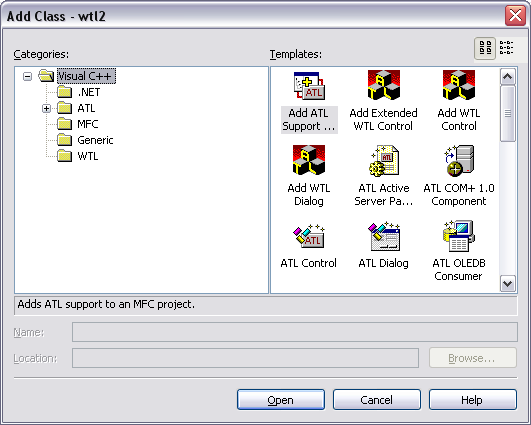
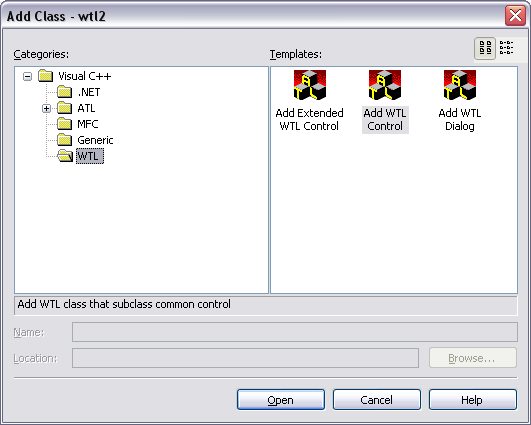
As you can see I've added 3 wizards. They have equal icons because I have no any paint skills. So I get the icon from WTL.
Let see each wizard.
Dialogue wizard 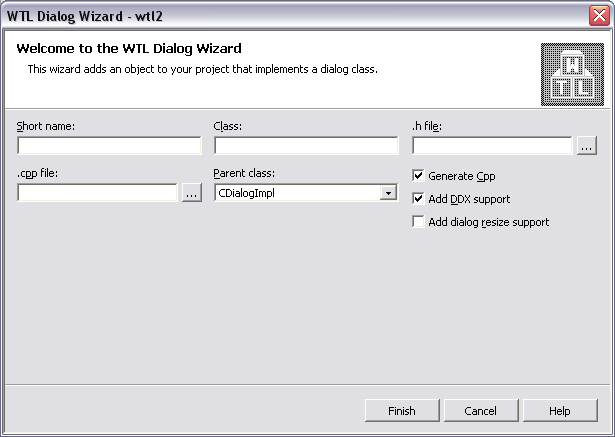
Short name is name, which will be used to generate IDD of dialogue and for generation all other fields. The base class can be CDialogImpl, CAxDialogImpl, CPropertyPageImpl,CAxPropertyPageImpl. There is one other type Form View here. It is CDialogImpl based class differ only by resource.
Generate Cpp flag says that implementation of the class will be in cpp file.
Flag Add DDX support says that one of the bases of the class will be CWinDataExchange, also empty DDX map will be created and into OnInitDialog and into OnOK will be added method DoDataExchange().
And finally, flag Add dialog resize support will add base CDialogResize, create empty DLGRESIZE map and insert into OnInitDialog function DlgResize_Init.
Let see other wizards.
Subclassing control wizard 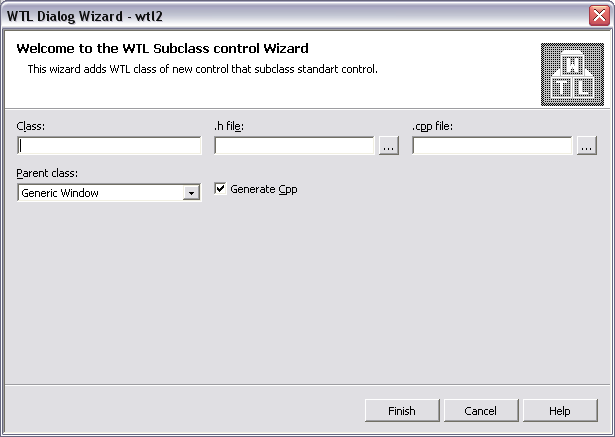
This one create a class which subclass standard control. I.e. a new class will be like that
public CWindowImpl<CMyControlClass, CEdit>
For subclassing edit control
And Extended WTL Control wizard 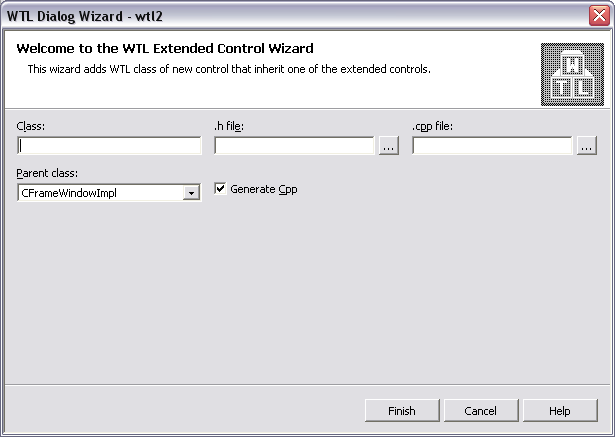
This one create new class that is inherited from WTL class like that
public CScrollImpl<CMyScrollImpl>
Example of inheritance of CScrollImpl. Conclusion I hope these wizards will be useful for you. Download on download page
You can donate this project.
|
|